")
Are you ready to enter a world where making transactions across borders feels just as easy as buying something in your own neighborhood? Well then you need to look no further, as Payoneer has got you covered. In the contemporary era, where the advent of internet has now made it a possibility to explore beyond the borders in a manner that’s effortless, and collaborate in business with people who might be thousands of miles apart.
So, imagine a possibility where you can not only manage international payments, but also expand your business and sail through your way into the global market. In this step-by-step guide on how to create a Payoneer account, you’ll dive into the quest of discovering financial independence and uncover the easy steps involved in creating your very own Payoneer account. Lets, embark on the exciting journey of unlocking global financial freedom.
An Insightful Glimpse
What is Payoneer? – Unlock Global Financial Freedom
Payoneer was initially founded in 2005 by Yuval Tal and his brother, Gilad Tal. The headquarters of Payoneer is located in New York City, USA. It has since evolved into a globally used platform that’s used for all the financial-related queries such as transferring money internationally, making payments online, and most importantly facilitating freelancers and businesses all around the world by providing financial services in a manner that’s very convenient.
Important thing to note is that Payoneer will provide you with MasterCard free of cost, given you have an account. Moreover, you can even withdraw cash from the Atm using this Payoneer MasterCard. Various transnational enterprise such as Firefox, Google, Upwork, Airbnb and Amazon, allows you to use Payoneer as a payment method.
Pros and Cons of Payoneer – Unlock Global Financial Freedom
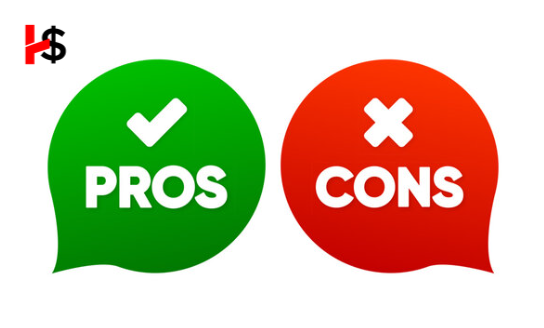
Pros of Payoneer:
- It’s Global Accessibility, as it facilitates its users to send and receive payments internationally, without any hassle. This feature of Payoneer has made it a popular option amongst freelancers, businesses and other professionals, that conduct business worldwide.
- Its ability to provide Multi-Currency Support. This feature allows users to hold balances in multiple currencies, for instance dollars, euros, and more. This makes it very easy to perform transactions in different parts of the world without the need of having multiple bank accounts.
- Its ability to make Quick Transactions, as Payoneer is known for its well-organized payment processing system. This system ensures that transactions are completed in a manner that’s swift, as it is crucial for businesses and freelancers that are working with tight schedules, to get their payments on time.
- The website Interface is easy to use, which means it’s designed in a way that’s simple to understand. You can easily create an account and do all your money stuff without any confusion.
- Payoneer can team up with big work and selling websites like Upwork, Fiverr, and Amazon. This makes it super easy for freelancers to handle and get their money, no matter where they are in the world.
- With Payoneer, you get a special card called a prepaid Mastercard. This card makes it really easy for you to use the money in your account. You can buy things online and take out cash from ATMs anywhere in the world. It’s super convenient!
- It has a feature where you can Request your Payment. For instance, users can simply send their payment request to the clients. This makes the entire process of sending an invoice and receiving payment smooth.
- Its Transparent Fee Structure. Having a transparent fee structure, essentially means that it provides the users information about transaction fees and currency conversion rates, making this entire financial management process easier.
Cons of Payoneer:
- Payoneer charges Fees for Some Transactions. This means that it will deduct charges for some transactions, such as converting currency or when you withdraw an amount from the atm.
- The Verification Process can take some time, as initially in the verification process for a Payoneer account you maybe required to submit some extra documentation, and then you also have to wait for the approval as it can take some time. This might be a drawback for people that are looking for quick solutions.
- Delay in Customer Service Response Time. Many users have reported that the response time for Payoneer’s customer service was long.
- Provides Limited Service for Accounts that are personal. Payoneer is mostly designed for businesses and freelancers, not regular individuals like you and me. So, if you’re just a person wanting typical banking services, Payoneer might not have everything you need. It’s more focused on helping businesses and freelancers with their money stuff.
- Its Dependence on Internet, as Payoneer works on the internet. So, if your internet is not very good, using Payoneer might be a bit tricky. So, people in places where the internet is not always reliable might find it hard to use Payoneer regularly.
- Limits on withdrawing amounts as, Payoneer has rules about how much money you can take out at once. If you’re dealing with a lot of money or have special money needs, these limits might be something to think about.
- Probability of getting your Account Frozen, some people using Payoneer have experienced their accounts getting ‘frozen,’ which means they can’t use them for a bit. To fix this, you might have to do some extra checks to prove everything is okay. It can be a bit of a hassle.
Things to Know Before Creating Your Payoneer Account:
- First of all, you need to collect and organize all your documents such as ID Card and Bank Account Details (IBAN)
- Secondly, you need to enter details in Payoneer signup fields, that are one hundred percent correct.
- Thirdly, you need to enter all the security details correctly.
- Fourthly, you need to enter all the details regarding your Bank Account Information.
- Fifthly, you need to go through the verification process, that is required to successfully make a payoneer account.
STEP NO 1:
Assembling and Organizing all the Relevant Documents — Unlock Global Financial Freedom
All you need to do in this step is to collect all the relevant documents, required for creating an account on Payoneer.
All the required documents required for successfully creating an account are listed below:
- National Identity Card: You need to take a Picture of both the Front and Back sides of your card.
- Details of your Other Bank Account: If you have another bank account registered with the same name as the one on your ID card, you are required to provide it.
- The IBAN number of Bank Account: The number that written usually in the cheque book, you are required to enter it.
- Full Name, Date of birth: You need to enter your full name and date of birth, with the same spellings as the ones in your ID card.
- Full Residential Address: You are required to add your full residential address, same as the one that’s mentioned in your ID card.
- Email Address and Phone number: You need to mention the email address and phone number that currently in use, as both of these will be used for verification purposes.
STEP NO.2:
Sign-up – Unlock Global Financial Freedom
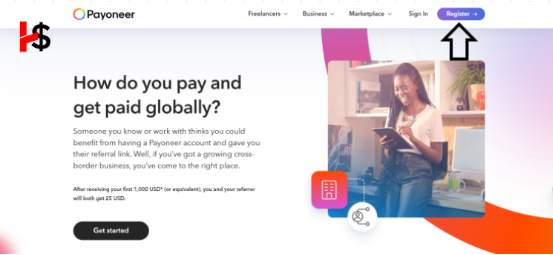
First you need to go to their official website and then click on the register button
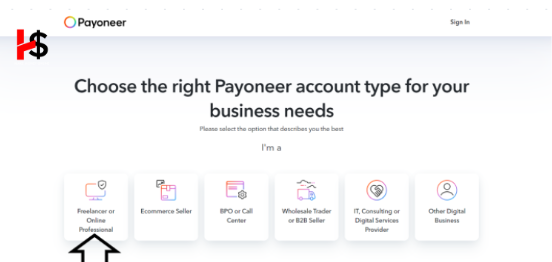
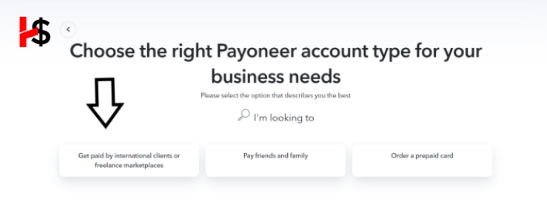
Next you need to click on “Freelancer, Service Provider, or SMB“, If you are a freelancer
Once you’ve selected the freelancing or online professional option, next step involves simply clicking on the “Get paid international clients or freelance marketplaces“
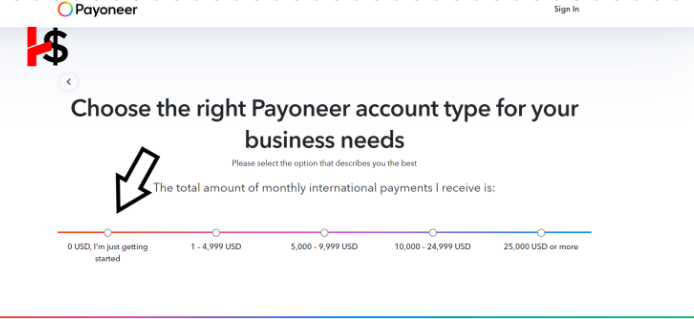
Next step is to click on ” 0 USD, I’m just getting started” option
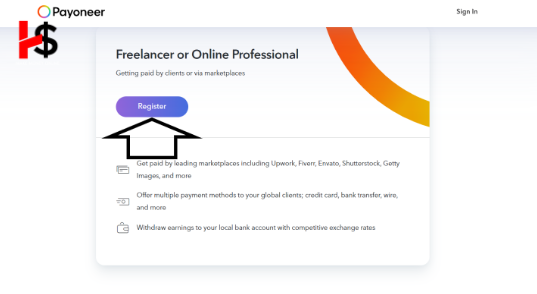
The actual registration process will start after you click on the “Register” button. Start by filling in the business type and the personal information below.
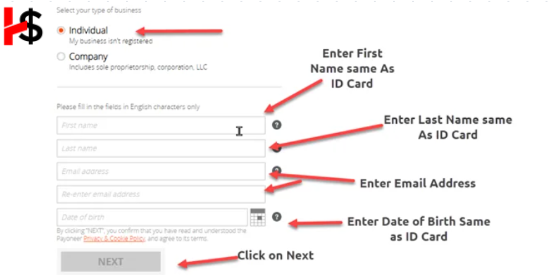
SIGN-UP - Unlock Global Financial FreedomAs we go on, make sure to put in the right details in this part. Double-check for any spelling errors and use the same spellings as on your ID card.
You first need to select Individual account type, followed by entering information that is one hundred percent correct in every single field such as
- Entering your First Name and Last Name. Make sure you enter spellings identical to those on your Id card.
- Next you’ll be required to enter identical Email address twice, for instance the same you enter while making an account on any social media platform.
- Enter your Date of Birth, making sure its in Correspondence to your ID card.
- After you have correctly filled all the required fields, the last step involves simply clicking on the “Next“ button.
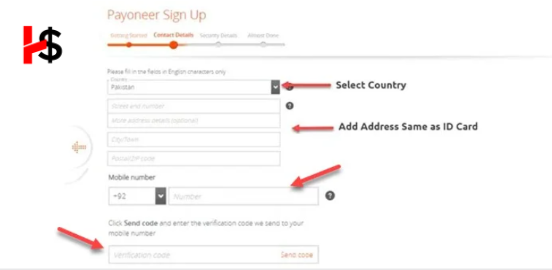
Enter all your Contact Details- Unlock Global Financial FreedomAfter your done with entering all your personal details. Next step is to enter all your “Contact Details” in Payoneer, in a correct manner.
- First you simply need to Select Country. Making sure you select the same country as the one in your Id card.
- Proceed by entering your correct Street Address into the next Field. Again, make sure it’s in correspondence your Id card.
- Correctly enter your City Name and Postal / Zip Code.
- Next, you need to enter a mobile number, that’s currently in use as they will use it for verification purpose.
- After you have entered the mobile number, simply click on the button that’s below” Send Code”, and you will receive a code.
- Enter the Verification Code, you received in the field.
- After you have filled all the fields, the last step is to simply click on “Next “button.
STEP NO.3:
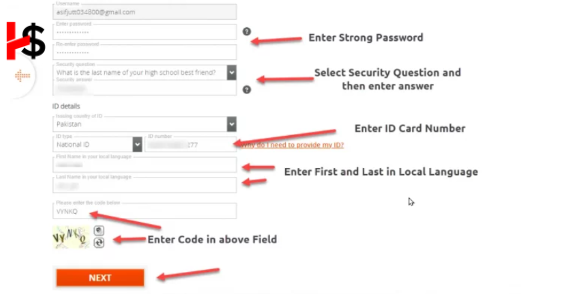
Entering the Security Details – Unlock Global Financial Freedom
This step involves, filling in all the security related information.
Enter all “Security Details “correctly and remember to choose a strong password.
The steps involved in the process are as follow:
- First step, involves entering a strong password, that contains numbers, special characters, and at least one capital letter.
Important note: Don’t forget your password.
- In this step you are required to choose both the security question and the answer to it. Make sure you remember both the question and the answer to it.
- Next you are required to enter the ID Card number.
- Last field requires you to enter both your First and Last name in your Local Language, if you don’t know how, then simple use Google Translators.
- Followed by completing the captcha.
STEP NO.4:
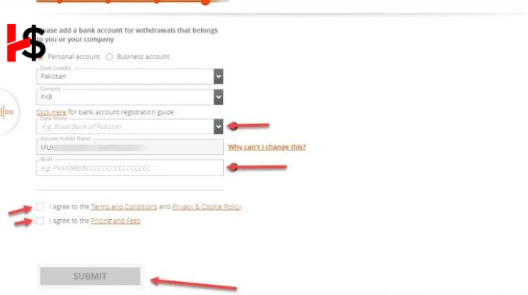
Enter Your Bank Account Details – Unlock Global Financial Freedom
As perceived by its name, this step requires entering all your banking details correctly. This step is mandatory in order to create your Payoneer account and then to use it for withdrawing money.
- Start by entering your Bank name
- Next, you need to enter the correct Account Holder’s Name, making sure it matches the name on both your ID Card and Payoneer Account.
- Next, you need to enter the IBAN number.
- This last step involves clicking” I agree” on both the checkboxes.
- Once, you have entered all the information, you need to simply click on the Submit button in order to proceed.
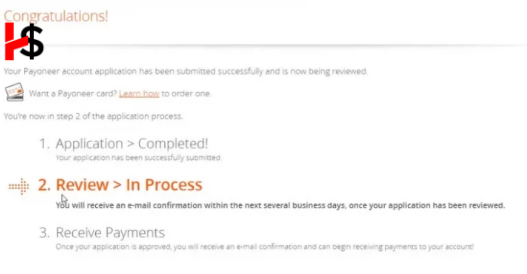
Congratulations, you’ve completed all the steps required for registration now all you need to do is wait for your account to get verified, as a review is in Progress.
STEP NO.5:
Verification- Unlock Global Financial Freedom
Moving forward, in this step you need to open your Gmail Account. When you’ll open it you will see two new emails, the first one will be “Verify Email Address” and the Second one will be “Application Is Under Review“.
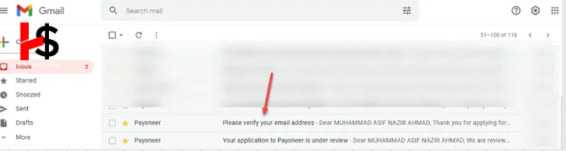
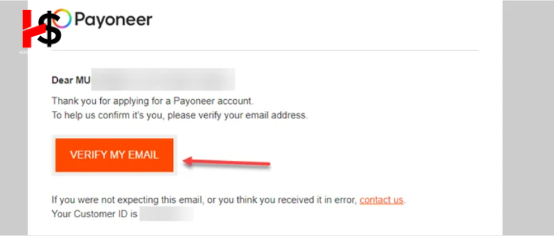
After you’ve received the emails, all you have to do is open “Please verify your email address, followed by clicking on ” Verify My Email“.
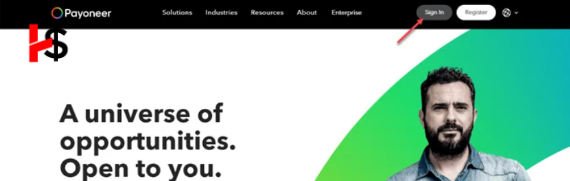
Once your email has been verified you need to go to the Payoneer’s website and click on the sign-in button, and enter your login details.
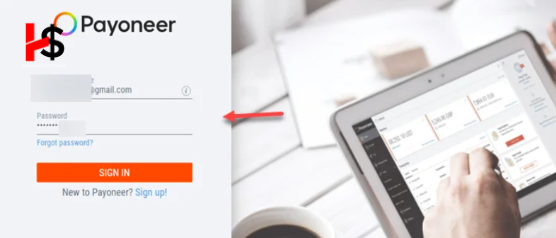
To proceed enter your login details, such as your email and password, then click on sign in button.
Once you’re done with the login process, the next step is to go to Payoneer > Settings > Verification Center.

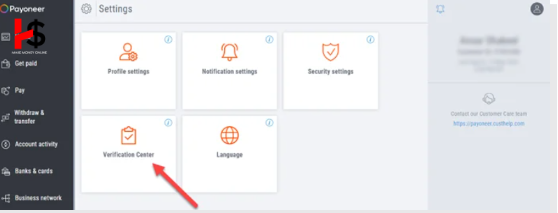
Now you need to click on Verification Center button, followed by clicking on Government Issued Photo ID.
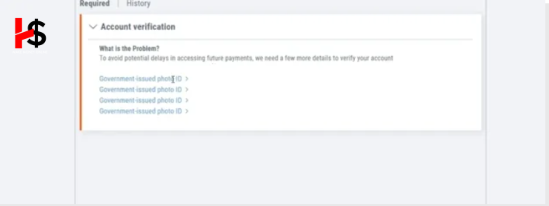
Here, you’re required to upload the front and back sides of your ID document.
- The ID card issued by the Government must include your full name, address, and an image that’s clearly visible.
- You also need to make sure all your documents are valid and not expired.
- Use a cam-scanner to take pictures of your documents as they need to be clearly visible.
- You are only allowed to upload the image in JPG, TIFF, GIF, PNG, and PDF formats.
- Additionally, you also need to make sure that the size of the document is less than 3MB. If the size exceeds the prescribed MB’s, you can use any image compressor online for free.

If you completed all the above steps correctly, including uploading an ID card, then your account will get approved within 1 business day. Although, It usually takes 3 to 5 business days for your account to get verified.
Important thing to note is that, if your account is still not approved after 5 days, then you need to contact support, or call Payoneer directly, the information is given on their website.
If you don’t have a Bank Account or you need to merge your Payoneer account with Fiverr, below are the steps to do so:- You need to create an account on Fiverr.com, if you don’t already have one.
- Then, open your account and go to the Settings menu and click on the Earnings, which should be under the Selling tab.
- You’ll be directed to another screen and on the next screen, you need to click on the Withdrawal options.
- You’ll be given three options and out of the three Withdrawal options, you need to open the Payoneer Bank Transfer.
- After that you need to go the Payoneer registration page.
- The last step is to complete the registration process.
After completing these 6 steps you’ll be all done. To sum it up, given above are 6 easy steps you can implement to open a Payoneer account without a bank account and be on your way to Unlock Global Financial Freedom
Below are some of the websites that allows you to pay through Payoneer
- Fiverr
- Upwork
- 99Designs
- Freelancer
- Amazon Affiliate Program
- PeoplePerHour
- TeeSpring
- Airbnb
- Envato
- Expert360
Conclusion – Unlock Global Financial Freedom
Payoneer is an excellent option if you want to pursue a career as a freelancer or to simply expand your business. Opening the account requires you to complete a series of easy steps, by providing authentic information. Once you’ve made an account on Payoneer, you can conduct business globally and withdraw cash from any ATM worldwide Although there are some cons, but if you look at it from a broader perspective, the pros outweighs the cons, and with just a little bit of effort you’ll be on your way to Unlock Global Financial Freedom.
Also Read
How to make money on Reddit
How to make money on Pinterest
How to make money on Amazon
The gatekept Techniques to make money on Quora
